What do you mean the garage is for cars…
Hard to believe its December. Seems like yesterday the leaves began to fall, but with our first dusting of snow a week ago winter is definitely on the way. With this holiday weekend I finally found some time to work on some much needed woodshop projects. Nothing fancy to see here so there will be no play by play re-cap of the build process, but I figured I needed to get back into more routine blog updates.
I have been playing music chairs with all of my power tools and occasionally setting up temporary work benches on sawhorses outside to support my chop saw, and projects but no more. The lifting and moving of the tools was a huge pain, and since the boss want to use her stall of the garage this winter to park her car, I needed to build some mobile benches/tool stands.
I had plenty of plywood and 2x’s that could be re-purposed to shop fixtures, so after a quick trip to Lowe’s for some 3” casters, and a quick search on the web for some inspiration I was ready to make some saw dust.
The goal was a moveable assembly bench that could double as an out feed table for my table saw, followed by a stand for my chop saw.
Out-feed Table:

The main objective here was to make a table that was 36” deep by 60” wide. The width happens to be pretty close to the width of my table saw. Another crucial dimension was the height of the table which needed to be equal to or slightly less than the top of the table saw. Other than that the table design is up for grabs.
I picked out some of the straighter 2×4’s and ripped them on the table saw so that they had square corners. The first saw set-up was for 3-1/4” width, ran all of the boards through, reset the saw for 3” width, flipped the boards so the square edge was on the fence and ran them through again. I then cut all the pieces to length on the chop saw. I had to do some math for the legs, subtracting out the casters, and the thickness of the table top, so I could hold the height dimension of my table saw top. With all the pieces cut to length I set up my stack dado head set. I cut a bunch of hap laps, and some 3/4” dadoes for the stretchers. with all the milling done all the joints are glued, clamped, and screwed. The overall dimensions for the 2x frame is approximately 29” wide by 48” long.

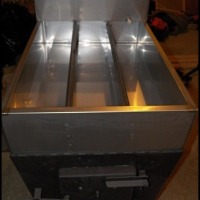
Next I cut one sheet of 3/4” particle board to 36” wide by 60” long and screwed it down to the 2x frame from above. Next I cut a second sheet of particle board oversize to 36-1/2” wide by 60-1/2” long and laid it on top of the first sheet of particle board making sure I had an overhang all the way around the first piece and screwed it down to the first sheet. I then broke out the router with a 1” flush cutting bit and cut went around the edge of the top. This router bit gave me a perfectly sized top layer of particle board that dimensionally matched the bottom layer of particle board.

I applied some contact cement to some left over plastic laminate I had and to the top of particle board table top and presto, an instantly slick table top surface. I left the laminate oversize and trimmed it flush with edge of the top with my router. A little bit of pine trim glued with biscuits, and nailed to the edge of the table and the top was nearly finished. The last thing I did was to ease the edge of the wood trim with a slight round over to help make sure and sheet goods I am pushing through the saw and onto the out feed table don’t hang up.

Chop Saw Stand:
The main objective with this project was to stop lugging this thing all around the garage to various work surfaces when I need to cut something. The cabinet construction here is basic as well. Basically a 2x frame that acts as a base for the casters. From this base I attached some 1/2” plywood that I had laying around for the sides and the back with 2x stretchers at the top-front and top-back of the box.

The dimensions for this box were dictated by my saw, so I decided on 24” deep by 30” wide for the top. The height was dictated by my out feed table, so once again I took the height of the table which is about 35” +/- and subtracted out the height of the saw (3”), the height of the top (1-3/4”), and the casters (3″-1/2”) to get the height of my box.
Once again, no frills, so a double layer of 3/4” particle board and one layer of some left over 1/4” birch plywood, assembled the same way as above using a router to trim each layer flush with previous layer. I center the chop saw and located it where I wanted it front to back and screwed that puppy down. From now on when I need to move this thing I will roll it into position…


Eventually, the out feed table will get a bench vise, and some much needed under table tool storage. The chop saw stand will get some pine trim, one top drawer and a bin for cut-offs / scrap wood. For now the shop mods are done, I have been asked to provide some wood frames for some canvas artwork and the boss is looking for a Quilting Platform for her sewing machine.
Share this:

7 Comments »
Leave a reply to The Belmont Rooster Cancel reply
About
A new homeowner, father, and husband chronicling his adventures in life.
Upgraded topo with elevations 12-05-2013

Hard at work
Top Posts & Pages


Pinterest

Blogs I Follow


AWESOME!!!
You know that ‘out feed table’ is too pretty to be in the garage and it matches the counters in my sewing studio. I think it might make the perfect cutting table for fabric…
You may cut any fabric you want on the out feed table as long as it’s done in the garage. Your cutting may need to wait until spring….
I have to agree with your wife, Bill. It’s way too good to be stuck in the garage…having said that, your garage is way too clean to be a garage. 🙂
I have to admit I did a thorough clean up and selectively located the projects during the photo shoot to help show the garage at its cleanest…
[…] had a big open space below the miter saw stand that I threw together in one of my previous posts and I wasn’t sure what to do with it until now. I decided on two side by side drawers with an […]
[…] had a big open space below the miter saw stand that I threw together in one of my previous posts and I wasn’t sure what to do with it until now. I decided on two side by side drawers with an […]