Greenhouse – Part 2

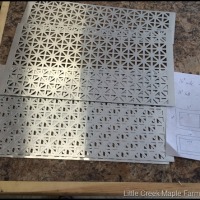
Still waiting for the cold weather and snowy pattern we are in to break here in New Hampshire. I was able to successfully disassemble the greenhouse and move it outside pretty easily with the help of Wen and the boys. Reassembly of the greenhouse was straight forward. With the frame complete I needed to add some strapping for my corrugated roof panels because I will be installing the roof panels with the flutes running vertically on the gambrel roof. This design change will help the gambrel roof shed snow up here in the great white tundra much easier than if the flutes were running horizontally. So I installed some 1×3 strapping perpendicular to the roof trusses two foot on center that would pick up the closure pieces for my roof panels.

With the strapping in place I needed my trusty assistant to help pass me the plastic closure strips that would attach directly to the strapping. These plastic pieces get screwed down and fill in the voids between the panels and the strapping.

It’s always good to have a second set of hands to help hold things in place and after all the greenhouse is like a mini jungle-Jim now. I ran out of short screws so I had to resort to using some 1-1/4” drywall screws that started to poke through the strapping. I will need to come along with a saws-all after the panels go up and trim off these pointy screws so I don’t wind up with any greenhouse injuries this spring.

A close up below of the plastic closure pieces as I installed them on the strapping. Not sure if you need to put a screw in every flute but I figured I better so I would limit my chances of having a panel blow off in high winds. I also plan on using corrugated roofing crews long enough to penetrate though the plastic closure strip and into the wood strapping itself.

We had to mock-up at least one plastic panel on the side and they seem to go up pretty quickly. I just need to cut the roof panels to the appropriate length and away we go.

Thinking of spring…

Share this:

Greenhouse – Part 1

Finally have an opportunity to sit down and write a few words. Despite the continuous snow fall that we seem to be getting lately, I am thinking spring. Inspired by searching for greenhouses on Pinterest I came across a greenhouse design PIN that we think would work for us from the Ana-white.com website I tweaked the design, a smidge as I always seem to do and started the build a couple of weekends ago. I ended up building it in the garage because it was hovering right around 0-degrees outside without wind chill at the time.
We decided to go 10’ x 10’ in size and figured we would use clear plastic panels to skin the whole outside. We are in a heavily wooded area so we are hoping that this will help get us to an early start this growing season before all the trees leaf out.
I ended up building this by myself in one weekend, and because I was building inside, I had to build it so it could be knocked down, moved out of the garage and assembled outside. The side walls are each their own components. The front and rear end walls are also their own components. Lastly the (4) roof trusses and ridge are one component. Anything that was not being disassembled was nailed, and any connection points that I was going to need to disassemble was put together with screws.
I started construction with the knee wall. I used a 2×4 PT sill plate and KD SPF 2×4 top plate and 2×4 studs 24” o.c. to build the knee walls. I threw and extra 2×4 in at the corners so I could easily screw in the front & rear walls to the sides walls.


Next I built the end walls. The first thing I did was to make the rafter gussets. The Ana-white website has a great video of how to this, which saved me from having to figure it out.

Essentially using a piece of blue tape and a couple quick marks on my chop saw you can mark the point where you make your 22.5-degree angle cuts and where you make your 90-degree cross cuts. This made for quick work of cutting out the dozen or so plywood gussets I needed for the trusses.


With all the gussets cut, I cut a total of 8 rafters 48” long with 22.5-degree angles on both ends. These are for the end walls. It easy to make a quick jig for cutting your rafters to length as well. With the rafters cut, I glued the but joint where they meet and clamped them to my work table. I then applied a liberal amount of glue to the face of the rafters getting the plywood gusset plate, and clamped it down. Eight screw later and I was good to go. Just make sure you thing about the orientation of the gussets prior to assembly on your greenhouse. I wanted all gussets facing inside the greenhouse, so they would cause a problem when I side the outside face of the greenhouse walls.


Three gusset plates and four 48” roof rafters and I had the end wall roof rafter ready to go in place. I had to add a couple more 2×4’s to keep the end wall rigid when I go to move it outside. Rinse and repeat for the opposite end and away you go.

I got both end walls up and stopped for the night. The next day I set the ridge up and and made the rest of my rafters up and installed them. I don’t have many photos but it’s pretty easy to figure out. Just make sure you do the math on the lengths of your pieces so everything will work. I deviated from the Ana-white plans on the framing so some of my dimensions were slightly different. This goes up quick and is an easy build just take your time.

Share this:

Garden Bench 3.0

Just a quick re-cap of the tools and costs associated with this project in true “how to” “DIY” blogging fashion.
To learn more about the process you can refer to Building a Garden Bench Part One or Building a Garden Bench Part Two.
Tools needed:
- Various hand tools (hammer, chisel, pencil, quick square, framing square, rasp, pencil, 24” bar clamps, ratchet & sockets)
- Drill bits (3/16” standard drill bit, 3/8” standard drill bit, 1-1/4”spade bit)
- Power tools (10” sliding chop saw, skill saw, drill)
Materials:
| Description | QTY | Unit Cost | Total Cost |
| 4x4x8′ PT | 2 | $ 7.97 | $ 15.94 |
| 2x4x8′ PT | 1 | $ 3.77 | $ 3.77 |
| 2x8x8′ PT | 4 | $ 9.97 | $ 39.88 |
| 3/8×3-1/2″ zinc carriage bolts | 4 | $ 0.61 | $ 2.44 |
| 3/8×5″ zinc carriage bolts | 20 | $ 0.75 | $ 15.00 |
| 3/8″ hex nuts | 24 | $ 0.11 | $ 2.63 |
| 3/8″ flat washers | 24 | $ 0.13 | $ 3.11 |
| TOTAL MATERIALS | $ 82.77 |
Labor:
This was a tough one because there was a lot of starting & stopping but I would guess if you include the time taken to pick up the lumber, all the iced coffee breaks, and then the time it took to move this beast into position I bet you have 6-8 hours in this project. Probably less if you aren’t as easily distracted as I was by the garden and other chores around the house…
Share this:

Garden Bench 2.0

Assembly of our garden bench continued this morning. I continued to follow the plans mentioned in my earlier post, but given my realization that everything on the internet may not be true, I took a little more time laying things out rather than trusting measurements provided by the original site.
 With an iced coffee almost complete and my two helpers chomping at the bit to hammer things we were off and running. The first step was to drill a pilot hole for the the 3/8” carriage bolts that would hold the legs together. I did each joint separately making sure everything was tight and set the way I wanted it prior to drilling.

After drilling the 3/16” pilot hole through the joint, I flipped the leg assembly over and used a 1-1/4” spade bit to drill a counter bore that was about 1/2” deep. The purpose of this counter bore is so that the bolts, nuts and washer will be recessed in the wood and not protrude out from the face of the 4×4’s. With the counter bore complete I than drilled through the pilot using a 3/8” bit which is the same diameter of the carriage bolts.

Once the drilling for a single bolt was done we drove the carriage bolt in, flipped the leg assembly over and place a single washer and hex nut on the bolt.

The 1″-1/4” spade bit gives just enough room for the washer and the nut. It’s also the widest bit you want to use because you will eventually be counter boring on the 2x stretcher for the seal which is 1-1/2” thick so it gives you solid 1/8” of material on the sides of the counter bore.

There was a lot of drilling, hammering, and fire trucking on this project. With the legs bolted together I got to work on the seat. I mocked up the bench prior to drilling any holes to get the space of the 2×8’s on the seat and back part of the bench. I started with the first board of the seat pushing it to to the seat back 4×4’s. with that in place I took some 3/4” scrap boards I had laying around and arbitrarily chose that as my spacing between the boards. I laid the entire bench out with 3/4” gaps and liked the look so we started drilling using the same process as above.

First drilling a pilot hole through the lumber.

Than a counter bore with the spade bit.

Next drilling the full diameter of the carriage bolts (3/8”).

None of my drill bits were long enough to go all the way through the 2×8, I think I had a max depth of about 4”, so I then had to unclamp the 2×8 move it out of position and finish the 3/8” hole going only though the 2×8 like in the photo below.

When all the holes were drilled I simply tapped the 4” carriage bolts into the 2×8 hammering one bolt on each end about a 1/2” beyond the 2×8. This allowed me to align the bolts with the holes I drilled and a few quick taps and the 2×8 was in position.

Flipping the bench over it was a simple matter of placing a washer on the bolt and tightening the nut.

This is a sturdy heavy bench that serves as a jumping off platform and should hopefully last a long time…

Share this:

About
A new homeowner, father, and husband chronicling his adventures in life.
Upgraded topo with elevations 12-05-2013

Hard at work
Top Posts & Pages


Pinterest

Blogs I Follow